Callym Lukie | Level Designer

Lost City of T'Vall
PROJECT OVERVIEW
A 6 minute PvE FPS level where the player fights monsters, gathering items to help them progress through the level and finally defeat the boss waiting at the end.
GOALS
To create a 5-10 minute FPS experience utilizing existing features from a successful IP. Deliver a dynamic experience that modernizes the old style FPS gameplay Quake delivers.
Duration
3 weeks
Genre
FPS / Adventure
Engine
Trenchbroom
**Art assets are official Quake assets and not created by me
Moment to Moment Breakdown
A look into the in depth beats of this 6 minute level with videos (the videos auto-play and loop, but you can restart them) to showcase the level beats in gameplay.
The intensity describes how hard the beat feels, and the difficulty is how hard the beat is meant to be.
1.a - Cave Discovery
Exploration
Difficulty: 1/10
Intensity: 1/10
Duration: 10s
The player begins by exploring a tight empty cave entrance familiarizing themselves with the movement controls. Leading lines and lighting help direct the player in the correct direction.
1.b - A Guarded Entrance
Combat
Difficulty: 2/10
Intensity: 4/10
Duration: 25s
The player encounters it's first two melee enemies at a distance allowing them to practice combat. The player progresses into a small building where they defeat more enemies, and learn about buttons that can be used to open doors.
1.c - Secret City of T'Vall
Exploration / Combat
Difficulty: 3/10
Intensity: 3/10
Duration: 25s
Players are presented with a large angel landmark before they approach a door that requires a button to progress forward. The player goes to the right pressing a button, but this time it also triggers a surprise combat encounter the player must beat before progressing forward.
1.ca - A Caged Encounter
Optional Combat
Difficulty: 6/10
Intensity: 7/10
Duration: 15-20s
An optional mini boss fight the player can complete that grants them with a quad-damage powerup for the next 30 seconds.
1.d - Doorway Forward
Combat
Difficulty: 5/10
Intensity: 7/10
Duration: 40s
Approaching the front door of the next building players are presented with two projectile based enemies and a locked door. After beating this encounter the player is ambushed when the locked door is opened forcing them to use the previous space to kite the melee enemies. They are then tasked with fighting a explosive enemy by utilizing pillars and other cover to dodge the explosives.
1.e - A New Weapon
Combat / Tutorial
Difficulty: 3/10
Intensity: 3/10
Duration: 20s
Ascending the stairs, players are faced with a tight hallway where two melee enemies approach them. Behind the enemies is a new Nail Gun weapon that when collected prompts a gameplay tutorial showcasing the weapons strengths.
1.ea - Secret Shotgun
Optional Exploration
Difficulty: 1/10
Intensity: 1/10
Duration: 10s
Through careful observation players can notice a box that is used for progression facing the opposite way. If players jump down into a lit courtyard they can search the surrounding area for a Super Shotgun upgrade before continuing their way forward.
1.f - Rooftop Fight
Combat
Difficulty: 3/10
Intensity: 6/10
Duration: 15s
After completing the Nail Gun tutorial, players then move forward across the rooftop getting a view of their progress through a vantage point on where they came from. After completing some combat the players arrive at the base of the previously viewed landmark.
1.fa - Angel's Secret
Optional Exploration
Difficulty: 1/10
Intensity: 1/10
Duration: 10s
The angel statue holds a secret inside for those who observe its design carefully. A few secret buttons give access to some armour that will buff the players defense.
2.a - The Forgotten City
Combat / Exploration
Difficulty: 2/10
Intensity: 5/10
Duration: 25s
Walking past the angel statue players enter a large open area where they fight a few Wizards, parkour across lava before gathering a new weapon, the Grenade Launcher, and if they continue to parkour more the player finds bonus ammo.
2.aa - Fiery Floatation
Optional Exploration
Difficulty: 1/10
Intensity: 1/10
Duration: 20s
Behind the lava waterfall the player finds an invincibility powerup which can be used to ignore damage from upcoming encounters, or players can swim up the lava waterfall to gather a new weapon, the Super Nail Gun.
2.b -Guarded Gates
Combat / Tutorial
Difficulty: 2/10
Intensity: 7/10
Duration: 15s
The player approaches a lava moat where the player triggers a tutorial encounter for the rocket launcher featuring large groups of enemies to showcase its AOE damage capabilities. After the encounter, the player located a nearby button to open the gates forward.
3.a - Forgotten Castle Guard
Combat
Difficulty: 8/10
Intensity: 9/10
Duration: 30s
The player triggers a ambush encounter that tests their quick decision making skills. A projectile based enemy covers for a few melee enemies forcing the player to quickly make a decision on the most important targets. After completion, the player open the nearby gate to a castle-like structure with a key just out of reach.
3.b - The Castle With the Key
Combat
Difficulty: 7/10
Intensity: 9/10
Duration: 70s
The player triggers multiple encounters inside, and outside the castle space before they reach the silver key viewed at the beginning. They player then uses that key to access the bridges above lava to continue forward.
3.c - A Path to Completion
Combat
Difficulty: 5/10
Intensity: 6/10
Duration: 15s
After taking the moving platform, the player triggers a hit scan encounter that leaves a subtle tutorial to prepare players for the next surprise bossfight.
3.d - Monstrous Conflict
Combat
Difficulty: 7/10
Intensity: 10/10
Duration: 20s
After completing the previous encounter, the player triggers a boss fight where they must utilize all the techniques learned to kite the bosses melee attacks, dodge its hit scan lightning, and defeat the boss before opening the final gate before the portal out.
3.f - The Way Out
Exploration
Difficulty: 1/10
Intensity: 1/10
Duration: 5s
The player walks down the last of the lava bridge to reach the exit teleporter to complete the level.
TOP VIEW

2D LAYOUT

Full Playthrough Video
Iterations
Grenade Tutorial Encounter
Before
Issues
-
Encounter space doesn't support the grenade launcher.
-
The combat trigger happens to late making this combat an unintentional surprise.
-
If players attack too fast they end up damaging themselves with the grenade launcher.
After
Fixes
-
Moved the trigger so combat is initiated further back giving players time to access their situation, and plan of attack.
-
Removing the connecting platforms dissuades players from jumping the gap to get into close range where the grenade launcher can damage themself.
-
The gap in the middle supports the grenade launchers projectile based attack.
Melee Combat Encounter
Before
Issues
-
Encounter space forces players into an unintentional dps race against the approaching enemy which often results in damage taken.
-
There is no room for horizontal movement to strafe enemies.
-
The button forces players to do a 180 in order to see enemies, and doesn't showcase the locked door opening.
After
Fixes
-
Added a space for players to bait enemies to the right creating space for players to strafe past enemies left and avoid damage.
-
After pressing the button, players can observe the locked door opening, and have a shorter turn to view incoming enemies.
Key Placement
Before
Issues
-
Key is hidden behind a gate, and not visible from certain angles while waiting for the gate.
-
When players finally notice the key, it distracts them from incoming combat.
After
Fixes
-
The key is visible before entering the new space allowing players to understand their objective before they start it.
-
Combat is clearly communicated without distractions.
Landmark Visibility
Before
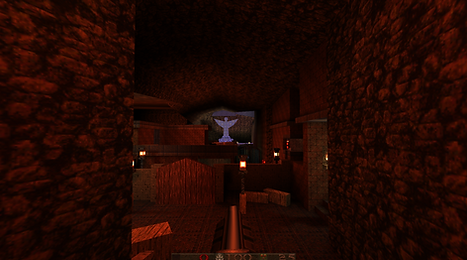
-
The background lighting causes the statue to blend in with its surroundings more than I'd like it too.
-
The statue looks important, but doesn't look like a destination.
After
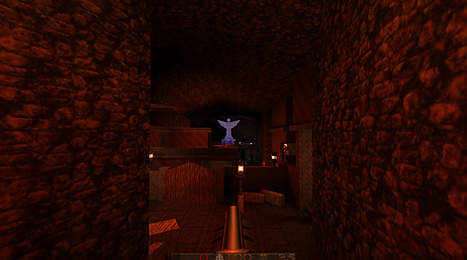
-
The background forces the player to observe the landmark as an important piece of the level.
-
The landmark stands out from its surroundings.
Combat Implimentation
Initial Planning


Playing with each monster allowed me to understand how they were designed to fight. Some have a leaping attack and a melee attack, some are projectile based. Learning how they attacked, and how they moved allowed me to tailor specific encounters with environments that allowed the player to take cover from hit scan, strafe around projectile shots, or loop around melee enemies to avoid being hit.
Types of Encounters
Hit Scan
Hit scan means shots have no travel time and instantly hit the player if in the enemies crosshair.
I designed this hit scan encounter with pillars so players could take cover behind them to dodge shots.
Projectile
Projectile enemies have attacks that take a certain amount of time to reach the play. In Quake enemies shoot at the player position instead of predicting future movements.
This space was designed as a wide open room to allow enough space to strafe shots and avoid being hit through horizontal movement.
Melee
Melee monsters required players to be close in order to deal damage. Each enemy has a certain melee range.
I designed this encounter to have enough space for player to sneak past melee enemies to create more distance. The small strafe to the right into open space baits enemies to come closer to the wall allowing players to sneak past them on the other side of the hallway.
Projectile + Melee
This encounter combines both projectile and melee enemies.
I built this encounter around allowing the player to circle melee enemies around a lava pit while dodging projectile shots with their continues movement.
These two enemy types have kits that work really well together as melee enemies force players to move away from them, but projectile enemies require the player to move horizontally to avoid incoming shots.
Level Design Techniques
Landmarks

I presented the player with an obvious landmark early so they had a goal to work towards. It served as a place that proved players were moving forward, and a good signifier of future events.
Lighting and Breadcrumbing

I used lighting, a lantern asset, and item pickups to help lead players forward in the level.
Framing and Leading Lines

I used leading lines and framing to showcase important progression, items, or encounter aspects of my level to palyers.
Affordance

I used the same wood and button texture to highlight interactable elements and the path forward. The wood texture was often on doors, platforms, or doorways forward. The red button was consistent throughout the level so players could easily understand which pieces were buttons.
No Text Gameplay Tutorials


Often games resort to text pop-ups to communicate gameplay mechanics. Because Quake features simple mechanics I was able to design tutorial encounters that taught players new weapons and enemies.
I took advantage of Quake's feature that automatically equips new weapons when you first get them to give players an encounter specifically tailored to the new weapon shortly after they picked it up. This allowed players to learn about the new weapons strengths without any text pop-ups.
Spatial Recontextualization
A great way to show progress is showcasing places players had previously visited. Here I created a viewpoint that allowed players to look over where they had come from. This showed that they had made progress as that part of the level is now behind them.
Post Mortem + Challenges
This project went by quick. It took me about..
-
3 days to learn a brand new engine.
-
4 days to plan encounters, the 2D layout, and learn about the monsters and weapons in Quake.
-
4 days to get a rough block out with basic geometry and materials.
-
10 days to finalize, set dress, and iterate on different sections to create a complete experience from start to finish.
The biggest problem I had was balancing combat. Managing ammo, health, and shield as resources was tricky to get right and had to undergo a lot of playtesting in order to get the correct economy I wanted.